Friday, July 27, 2012

Second Lulu Blog Book!

Guess what?! (Hint: If you read the title, you'll probably win.) My second Lulu book came! I ordered it on July 13, and it came on Monday (July 25), so it had a 12 day turnaround. Not bad.


I love my second book even more than the first one. After looking at the first one and seeing how things transferred from monitor to book, I made a couple changes so now it's pretty much exactly how I want it.


First of all (and pretty obviously), I did more with the cover. I like the title bar on the first book, but I wanted this one to be different. So, I simplified the title bar by removing the strip of pictures. I then made a collage on Picmonkey (an awesome site I found a couple weeks ago that I love, and that you have unknowingly seen evidence of on my blog in form of those picture collages I've been doing) using some pictures from the year, and centered that underneath the title. I put both of those (the title and the picture collage) on the polka dot background, which I slightly enlarged (so the polka dots are bigger) and changed to a more yellow-blue tone. I also changed the font on the spine.


I really like how it turned out!


Secondly, I changed the main inside font (Trebuchet) from size 12 to size 11. The size 12 seemed just a bit too big, but the size 11 is perfect. And it takes up less space! Which is great, because this book was also quiet a bit (40 pages) longer than the last one.


Lastly, I added more space in between the date stamp, title, and body of the posts. It just looked better on the printed page. I made the decision after seeing the spacing in the first book, but it was actually kind of tough as I was formatting this book; I kept wanting to put less space in between them. Some things just look different in Word than on the printed page. In Word: less space = looked better. Printed: more space = looked better. Anyway, I'm glad I did add a little more space. It looks good.


So that's my second blog book! I'm really happy with how it turned out. The price (for 188 pages, hardcover, black and white) was $20.02 with $4.99 shipping. I used a coupon code that got me $3.60 off, so my total was $21.41.

Again, I totally recommend Lulu for printing your blog into a book. It does take more time and work than Blog2Print or Blurb (actually, scratch that - I think Blurb would have taken more time. But Blog2Print would have been less), but it's way cheaper and you can format it exactly how you want to. It's good quality printing and binding.

I updated this post on how to make a Lulu blog book, adding what I learned from this time around.

I'm working on this year's book already. I've copied and pasted all the posts up to this point, and I'm working on formatting them. From this point out, my plan is to work on the book once a month. I'll copy all that month's posts and format them in one go. That way, at the end of the year, I'll just have to do the last month's posts and be done with it. 
 
So, yeah! Lulu's great.


Be sure to check out these posts too!

Saturday, July 14, 2012

Another blog book on the way

I ordered my second Lulu Blog Book! This one is for the year 2011. I'll let you guys know when it comes. I changed a couple things this time around, and I'll let you know how that went.

I'm so excited!

Tuesday, July 3, 2012

We made Onesies!

So, when Jason's mom was here last time, she spoiled us quite a bit. We went shopping for Ellie at Kohl's, and she bought us these (along with a bunch of really cute baby clothes):


That's right, plain white onesies. Jason wanted to get them, because his creative mind could see the possibilities in them. We had to think about it for a while, though, before we really figured out what we wanted to do. And then we just went for it!

Drum roll please......dumdumdumdumdumDUM!

Tada!!!


Our custom-made onesies! We had a lot of fun making these. I'll go through and show how we made each one.


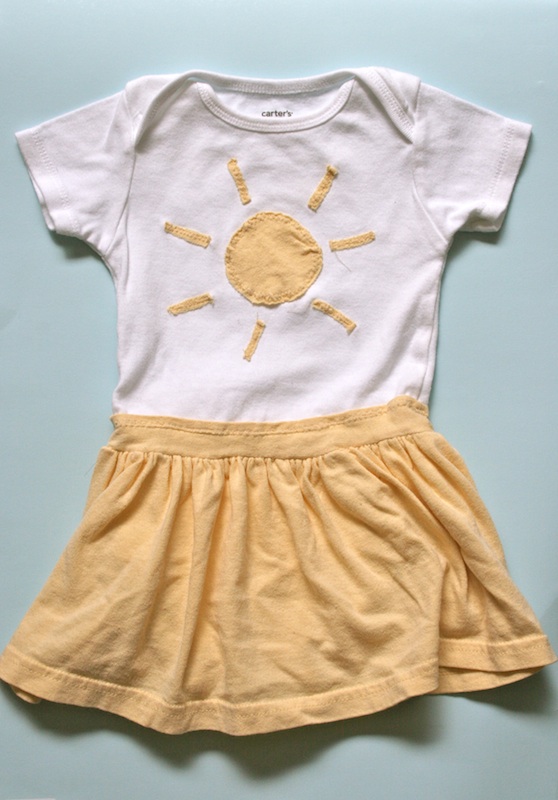
First of all, the sun onesie with attached skirt!


Both Jason and I wanted to attach a skirt to at least one of the onesies. Jason had a couple old t-shirts that we could use the fabric from, so I chose a nice yellow one. I cut off the whole bottom to use for the skirt, and then followed the tutorial here to attach it to the onesie.


I then made the sun using fabric from one of the sleeves. I attached it (the circle and the rays) using a zig-zag stitch. (I also used a zig-zag stitch when attaching the skirt to the onesie, to give it more stretch and allow it to slip over Ellie's head easier.)

Next, the cloud/sun/tree onesie!


Jason did this one. He used the design from this Threadless t-shirt. He sketched it out and drew it by hand! He's so dang talented!

Then we have the turtle onesie:


I made this one by making a stencil and using spray fabric paint. First I drew a turtle on paper and then cut it out.


I then attached double-sided tape to the back of the turtle and stuck it on the onesie.


Then I sprayed! I sprayed the front first, waited an hour, then sprayed the back and shoulders. I messed up a little, though; after I sprayed the shoulders I put the onesie down without thinking about it, and several paint drops got on the front. So, if you look at the finished picture, you can see some bigger drops on front. I'll be more cautious next time.


After waiting overnight, I peeled the turtle off. And voila!


Okay, next we have the flower onesie!


This one was really simple. I already had the flowers (made of yellow silk; I made them like a year ago. I made a ton of them. I've been trying to find ways to use them ever since) and I simply sewed them on to the front. Done!


And, last but definitely not least, we have the happy organ onesie!


Jason (of course) did this one as well. He is just so amazing. He got the design from this fellow, and then did it all by hand. He is so amazing!  Also, at one point when he was drawing it out, he was like, "Look, it's an organ trail!" (Organ...Oregon...yeah :) ) He also noted that the kidneys should be in the back, but if they were we wouldn't be able to see them. So, everyone, please come to terms with them being in the front.  And, one more note, I think the gallbladder is my favorite.

So that's our onesie extravaganza! It was seriously so fun to make them. We still have lots of supplies (we used fabric markers, spray fabric paint, and extra fabric), so we plan to make more in the future. (And, in case you were wondering what the supplies cost: We bought the fabric markers and fabric spray paint from Michael's. We used 40% off coupons we printed off from online, so the total was something like $13. Not bad at all.) We already went to Deseret Industries (Utah's version of Goodwill) and got some white onesies that we can decorate that were only 50 cents each.

Seriously, we had so much fun!

Monday, July 2, 2012

Photobook Comparisons

Okay, so if you're our friend or family member, or if you've been reading my blog for a long time, you know that I love photobooks. (My poor family, whenever they come to visit, has photobooks shoved in their hands to look at. And my friends, too, when I visit them. Sorry everybody! I hope you don't mind. I don't think you do. Right?)


I really love how they preserve memories in such a clean, classy way. I've never been a big traditional scrapbooker - too much glue and cutting things into odd shapes, and once you've made a layout, you can't change it. Digital scrapbooks are perfect for me - they offer flexibility (you can rearrange the layouts until they're just perfect) with no glue or glitter or scissors! I'm super comfortable with computers (as I think everyone in our generation is), so, perfect!

I was thinking about it today, and I had the idea of compiling a couple resources for photobooks so that you (if you're interested) can kind of scope out the market and see what's best for you.


When I was first starting out in photobooks, I found these photobook reviews that I found very, very helpful: 

The Great Photo Book Round-Up Review: Who Makes the Best Photo Books?
This review was started in April 2010, but the author has updated since then as some of the companies have updated their software and started offering different sizes or options.

The Daily Digi: Photobook Reviews - 12 Different Companies Compared
This was written in May 2010, so you should take that into account. As stated above, most companies have updated their software and have begun offering newer sizes and options since then.

I also just found this website this week, and I'm totally psyched to read this girl's comparisons of all the different companies:

PhotoBookGirl - Photo Book Reviews
This girl started this site in March 2010, but she's been updating her site and reviews regularly since then.


Personally, I'm a big fan of Shutterfly.  I've made several books with them now (close to 10, I think), and I've always been pleased with their quality. Their cover, binding, end pages, paper quality, and color accuracy are all very good. If I could change one thing, I would make their photo printing a bit higher resolution. But I'm still very happy with the books they make.

Plus, you can get great deals with Shutterfly. Like, really, really great. For example, this week I got a book for free. By sharing Shutterfly with five friends, I got a free book code, and Jason got a free shipping code from them in his email (he has an account he's used once, so he gets the promo code emails). By combining the two, we got a free 8x8 book with free shipping. We didn't pay a dime! Usually, you don't save so dramatically, but you can get a good deal (very commonly 30-40% off).

Some tips to save money with any photobook company:
  • If you're thinking about using the company, at least sign up for an account (you can use your junk email) so that you can get their coupons through email. 
  • Before you order a book from anyone, google search for their coupon codes - I've saved money that way.
  • Check out their facebook page, and look at the wall posts posted by regular people (not just the company) - often, people post coupon codes they're not going to use, or are looking to coupon code trades
  • Make your book, and if you don't have any particularly good coupons or there's not a sale at the moment, wait. Don't order it. Just let the book sit in your account, and wait for good deals to come along. My stepsister does this, and by waiting for a 50% off sale she'll save a ton of money!

Right now I'm looking into AdoramaPix or MyPublisher to do our wedding book. Both are pricey, but have really good reviews, and (to me) would be worth it for a wedding book. Both have lay-flat pages, too, which I want; I like the look of AdoramaPix's lay-flat pages better. AdoramaPix has thicker pages, too, which would be good for a wedding book. But since I watched the second video on this page (the video where he reviews his vacation book, which has super-glossy pages) I'm torn. I really want the best picture quality, but I also want thick lay-flat pages that don't have a gutter. Sigh. I'm just don't know.

Anyway, I hope that was all helpful to you. Good luck preserving your family memories!

To check out my photo book reviews, check out these posts:

Shutterfly Photo Book Review
Shutterfly Premium Leather Layflat Photo Book Review
Shutterfly Calendar Review
York Photo Photo Book Review
MyPublisher Photo Book Review
AdoramaPix Photo Book Review
Collage.com Photo Book Review 

Friday, June 22, 2012

How to make a Lulu Blog Book

Okay, first of all: this is easier than it looks. Don't get intimidated by this process because the instructions look long. It's actually really easy. Just try it.

(Note: Here's my second Lulu Blog Book!)

My Lulu blog book arrived this last weekend, and I love it. I seriously do. I totally want to do my future blog books like this. Here's what it came wrapped like:


Here's the cover (I got the hardcover "Casewrap") and what some of the posts look like in the book:


Here's a shot of the binding (which seems sturdy):


The only construction fault I can find is that in the between the cover and the first end page, a thin line of orange glue is visible:


It's not too noticeable; I didn't see it until I was taking pictures.

The picture quality is good (not amazing); it's what I was expecting for black and white on this type of paper. (The paper is what you'd find in a good quality hardback. It's not shiny paper, like Shutterfly; it's matte. But still good quality.)


The photos have a bit of graininess to them; again, it's not Shutterfly. But, it's what I was expecting and they do their job of preserving memories just fine.

Here's the back:


And that's the book! I'm a fan.

Okay, since it does take some work to put it together (it's not just a one-click process),  I'm going to go through the step-by-step process you would need to do to make a blog book with Lulu. To make a book with Lulu, you need to make a pdf file of your blog and upload it to their site.


Here's how you can make a Lulu blog book (faster and better than I did):

Before you start: Start with a computer that has both internet and Microsoft Word. This will make everything so much easier.

Step 1: Get Lulu's template.
           Go to Lulu's website (www.lulu.com), click on "publish" at the top, click "start publishing your book," sign up for a free membership, and then choose the size book you want. I did a a hardcover "Casewrap" 8.25x10.75, as it was closest to what Blog2Print and Blurb both offer and seemed to be the best format for a blog. Once you've chosen the size, download the template they have for that size. Open the doc file on your computer. (For example, the file I opened was "8.25_template.doc")

Step 2: Get your posts.
           From your live blog, copy and paste each post (including date, title, and comments) to that Word document. Do this chronologically (start with the oldest post first), so that when you read the book you're reading from oldest to newest.

Step 3: Make your pictures smaller.
           If you want smaller pictures (for easier formatting and to save pages), you have two options:
  1. You can select the picture and shrink it right in Word, or 
  2. Go to the Post Editor in Blogger. Click on each post, resize the pictures, and copy and past the post body into your document.
The first way is way easier. One important note, however: When I resized pictures from small to medium in Word, they turned out more pixelated in the blog book (even though they looked okay in Word). If you want to resize a picture from small to bigger, do it in Blogger. Big to small = Word's fine.


Step 4:  Change your fonts.
           The easiest way to do this would probably be with Word's "Styles" feature. Word probably has an explanation of how to use it in its "help section," or you could just follow these directions:
           Find where it says "Styles"on the right side of the "Home Bar." It has a few default styles, but you can create your own custom style by changing a section of text to the font, size, and color that you want it (for example, I changed the first title to the font Georgia, size 24), highlighting that section, clicking on the bottom of the three arrows on the left of "Change Styles," and clicking on "Save selection as a new quick style." You give it a name, such as "Titles." Then just go to each blog post, highlight the title, click on the style "Titles," and voila! It will change it to your custom font, size, and color.

For my titles, I used Georgia size 12. For the date stamp I changed it to MS Reference Sans Serif size 12, white, and highlighted the background gray. (I had to do the highlighting manually. You can't do it in "Styles.") I also did the same thing with the "Comments" title at the bottom of the post, except I changed it to Georgia size 16. My basic font was Trebuchet size 12. (Note: the Trebuchet size 12 looks a little big in the printed book, so for my second book I changed it to Trebuchet size 11. Now it looks great!)


           So, first highlight ALL your text and change it to your basic font. Then, make a "style" for your date stamp, title, and comments title. Go through each post and change what you want using your "style."
           If that didn't make sense, search Word's help section for "styles." It really will save you time. :)

Step 5: Format your comments. 
           Copying and pasting may have messed their format up a bit. What I did was remove all the hyperlinks (you can do this by right clicking on a blue underlined word and selecting "Remove Hyperlink"), changed the font color back to black, removed the underlining, removed the pictures, bolded the names of the commenters, and spaced and dashed their name apart from the date/time they posted the comment.


(Note: If you're somewhat tech savy, you can run a macro in Word and remove all hyperlinks at once. Just google how to do it. I did this for my second Lulu blog book, and it saved me a lot of time!)

Step 6: Format your posts.
           Space and format your posts how you want them; this is where you can space them so each new post starts on its own page.  In my own book I spaced the posts so that most of them started on their own page. Some fit together well, so I left them on the same page. I also paid attention to the page numbers at the bottom of each page, and tried to keep two-page posts facing each other on a left and right page spread. 

Most posts started on their own page, but these two fit well together so I left the second one underneath the first one's comments.


Step 7: See if you have extra space.
           Go through and see if you have any extra space on any pages you'd like to take advantage of by making some pictures bigger.  After changing all the fonts and spacing all the posts,  I went through and wrote down if I had extra space on any page. On several posts I went back to blogger and got a "medium" or "large" sized picture to replace a "small" one.  

This post was going to take up two pages no matter what, but I had lots of extra room on the second page. So, I went back and made two of the pictures large because I could.

Step 8: Create your title page.
           Create your title page on the very first page of the book. Leave page #2 empty if you'd like your table of contents to start on the right side.

Step 9: Create a table of contents.
           Time to create a table of contents!  I put my table of contents on page #3, after the title page and a blank page. "Contents"  was the title at the top in Georgia size 24, and below that I created a two-column table with as many rows as I had posts. I used Trebuchet size 12 for the post titles in the table of contents. My table of contents was three pages long, so I left the page after it (#6, a left page) blank so that my first post would start on a right page.

Step 10: Do a final check.
           Do you have all your posts? Does each one have a date, title, and any comments that were written? Do you have all your pictures and are they the size you want them? If you want them to, does each post start on its own page? Is everything spaced how you want it? Do you have a title page? Do you have a table of contents? Are the page numbers in the table of contents accurate? Go through and make sure everything is the way you want it. (And make sure you're using the template from Lulu!)

Step 11: Save your Word document as a PDF file.
           It's very important to save your file correctly, since doing so will "embed" your fonts and pictures in the PDF and make sure they print correctly. Lulu has instructions here on how to save your file as the right kind of PDF, found here.

Step 12: Upload your PDF file to Lulu.
            Go back to your account on Lulu and go through the publishing steps again, which will lead you to upload your PDF file. Go through the steps to create the interior. It will give you a preview PDF; look through the whole thing and make sure everything's good.

Step 13: Use Lulu's Cover Wizard to create your cover.
           You can either use the templates they supply you, or you can create and upload your own jpg to use for the cover. Since I wanted a bit more customization, I created a jpg for the front and one for the back, uploaded them, and stuck them on. I then customized the spine. I made it white, with the title of my blog,  "Volume 1," and the dates it covers.

Step 14: Preview and order! You're done!

If I've missed anything or you have any questions, feel free to ask.

I want to remind you what I said at the beginning of this post: Creating a Lulu book is easier than it looks. Don't get intimidated by this process because the instructions look long. It's actually really easy. Just try it.

Like I said, I'm very pleased with the quality and the price. I'm pretty darn sure I'll be using Lulu to make my future blog books, which I plan on doing annually.

Woot!

Be sure to check out these posts, too!