Wednesday, February 19, 2014

Homemade Toffee

This week on Monday I was able to reintroduce milk into my diet. It's the first food I'm reintroducing and we're watching right now and for the next couple days to see if Baby has a reaction to it.

To celebrate, that night I made some toffee.

(The mini chocolate chips were Jason's addition.)

I remember my mom making toffee one time when I was a kid. It was so delicious and I hoped that she'd make it all the time. That was the only time I remember her making it, haha. :) But because of that time, I knew you can make it at home.

I looked up some recipes on Monday and decided to try this one: Best Toffee Ever - Super Easy. I didn't do the chocolate or the nuts, and I scaled it down to a 1/4 recipe, so the ingredients I ended up using were 1/2 cup butter, 1/2 cup sugar, and 1/8 teaspoon salt.

The first batch turned out horrible. Instructions on the internet were totally contradictory, some saying stir the whole time, some saying only stir once in a while, and I got confused and didn't know what to do and the sugar and butter separated and then the whole thing burned and smelled bad and I got super frustrated at the internet for lying lies to me.

The second batch turned out perfect, though! What I did was this: I put everything (the sugar, stick of butter, and salt) into a pot. I turned the heat on low-medium and stirred slowly with a wooden spoon the entire time. In the beginning when the butter and sugar were still a bit separated, I tipped the pot and mixed it all together really good every 30 seconds or so until they were fully mixed together. And then I stirred and stirred and stirred until the mixture turned a caramelly-color and got a bit thicker, and then poured it out onto a cookie sheet covered in wax paper. I spread it out with the wooden spoon I had been using to stir. And then I let it cool!


And it is gooood.

And that is the story of the two (well, now three) batches of toffee I've made this week.

Saturday, January 11, 2014

Homemade Playdough

Toddler got a play-doh set for Christmas, and she loves it. It's a little jungle set with a tree that makes "caterpillars" (ropes of play-doh) come out the top, an elephant you press down to make play-doh ears, hair, trunk, and tail, and a little turtle you press down on to make play-doh turtle legs. It also comes with some play-doh tools (like really blunt plastic knives, and a roller) to work with the play-doh.


Toddler's favorite things to do are make play-doh caterpillars with the three, squish the turtle, and press the knives into the play-doh to make random animals (which don't look anything like animals, but Toddler tells me what they are {like, "I made a dog!"}, so they're animals).

The kit came with four play-doh colors: a big thing of dark green, a small light green, a small blue, and a small orange. We lose a bit each time we play, though, as little chunks break off and get overlooked and then dry out on the kitchen floor. Even though we started out with enough dough to work with, our supply is quickly shrinking. Plus, I kind of want some more colors than the few we have.

So, vaguely remembering things I saw on pinterest a long time ago, I turned to the internet for a homemade playdough recipe. I used the first one at the top of the google page: How to Make Playdough (Play-doh), and it turned out great!

Here's the recipe (mostly for my own reference in the future):

2 cups flour
2 cups warm water
1 cup salt
2 tablespoons vegetable oil
1 tablespoon cream of tartar (optional for improved elasticity)
food coloring
scented oils (optional)

"Mix all the ingredients together" (I saved food coloring for after, though, so I could make multiple colors) "and stir over low heat. The dough will begin to thicken until it resembles mashed potatoes. When the dough pulls away from the sides and clumps in the center, remove the pan from heat and allow the dough to cool enough to handle. Important note: If your playdough is still sticky, you simply need to cook it longer!"

At first it was all liquid-y...


But in just a couple minutes it got a lot thicker...


And pretty soon it was done and ready for food coloring!


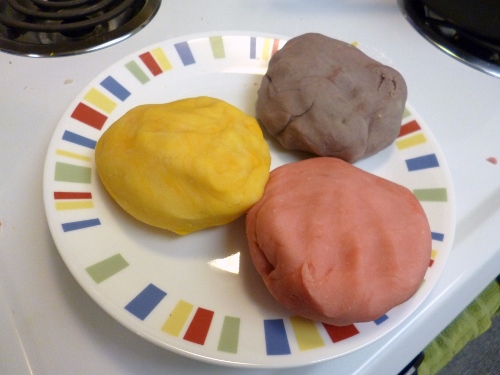
I split the batch into three parts and made yellow, pink, and (a kind of ugly) purple, but it makes so much that you could easily split it into four or five or six colors.


Then I just packaged the colors in random tupperware containers...


And it was ready to go!


I thought I was going to like the brand-name "Play-doh" dough better when compared to this homemade playdough, but boy was I wrong! I love the homemade playdough! My favorite thing about it is that it's softer and easier to work with. Toddler can make shapes and animals a lot easier (as can I), and the playdough goes through the little play-doh machines so much easier. Pushing down on the elephant and the tree, which was quite difficult before, is now very easy. And you might be worried that if it's softer, this homemade playdough doesn't hold its shape as well - but it does! The animals and shapes we've made with it are just as sturdy and totally hold their shape as well as the store-bought kind. I'm so impressed.

I really do love this homemade playdough. It was so easy to make and now we have such a large supply. I'm totally going to make this in the future instead of buying the brand name play-doh (even though I'm sure I'll get more little plastic play-doh sets and tools).

I totally recommend this as a quick and easy recipe to make great playdough for little kids!

Sunday, December 22, 2013

What shall we give to the babe in the manger?

I always love the last Sunday before Christmas. I love it because the music at church is always extra special that day - we get to sing so many of the Christmas hymns and listen to special musical numbers. And, at least for me, Christmas music brings the feeling of Christmas like nothing else can.

I saw this video yesterday, and loved it. It's a beautiful rendition of "What Shall We Give to the Babe in the Manger?" by the Mormon Tabernacle Choir, and it's got a great story to watch that goes along with it. It brought happiness into my heart and I hope it does to yours too.

"Easy Canvas Prints" Canvas Review

*Disclosure: I was given a free 8x10 canvas print by Easy Canvas Prints to do this review.

So, I've been thinking about canvas prints for a long time. I've seen them in friends' and family's houses, and I really like them I think they're a really cool way to display family pictures. I haven't ordered any before, though, because they tend to be expensive and there are so many companies to choose from that I haven't been sure where to start.

My sister-in-law Shelley posted about Easy Canvas Prints a while ago. I was also able to talk to Easy Canvas Prints (you can find their website at www.easycanvasprints.com) and get a canvas to review. I was very excited when I ordered it a couple weeks ago; my first canvas! The turnaround time was really great (very fast production time and shipping) and it arrived just a couple days later. Here it is:


Here's a close-up shot of the print quality:


And the sides:


I wish I had some other canvases to compare this to so that I could give you a more thorough review. I do like the canvas, for sure. It's a very cool medium and I like the way the image wraps around the sides. It's a cool display piece and doesn't need any kind of frame to stand out.

It's different from photo paper prints, though, in saturation and shading (especially noticeable around the faces when looking at it from certain angles). And I don't know if that's just how canvas prints are (the way that light reflects upon the ink on the canvas), or if that's how something about this certain company. Again, I wish I was more experienced with canvas prints so I could tell you.

My favorite photo book resource, Photo Book Girl, has started to review canvas prints as well. Here's her canvas reviews page (she hasn't reviewed many yet, but she does list many companies that do canvas prints): Canvas Print Reviews. And here's her canvas print deals page: Canvas Print Deals.

So again, if you'd like to check out Easy Canvas Prints, their website is www.easycanvasprints.com. They also have some affiliate companies that do custom printing, www.buildasign.com and www.alliedshirts.com.

Have you ever made a Canvas Print? What company did you use? Did you like them?

Wednesday, December 18, 2013

Shutterfly Premium Layflat Photo Book Review

This year I finally finished making our wedding album. It only took three years to put together, haha. :)

One of the reasons it took me so long to make this book is that it took me a long time to decide which photo book company to use. I knew that I wanted layflat pages, and when I first started planning this book there were only a few companies that offered that feature. (This picture is a good explanation of what layflat pages are.)

Two companies that I seriously considered were AdoramaPix and MyPublisher. I ordered different layflat photo book projects from each company to test them out. I decided against AdoramaPix because of the page constraints (you can only order very specific amounts of pages, and 76 pages was the most you could order) and the real photo paper in the books which, while very nice, wasn't as clear and sharp as I wanted. (You can read my whole AdoramaPix review here.)  I decided against MyPublisher because of the gutter in between the layflat pages and because some of the pictures in the album printed unexpectedly dark.

While I was trying to decided which company to use, Shutterfly came out with their Premium Leather photo books with layflat pages. At the same time, they upped the maximum number of pages per photo book from 100 pages to 111 pages. I had used Shutterfly many times before (you can see my big review of Shutterfly here), was very familiar with their software and print quality, and was really excited to see these new options. Once they came out with their layflat pages, it didn't take long before I decided to make my wedding album with them. So I did, and I'm very happy overall with the finished product.


Here are my thoughts on all the different aspects of the book:

Cover
I love the black leather cover with the stitching around the edges. For all of my other photobooks I have hard image covers (which I also love), but for this special album, our wedding album, it's really nice to have a classic, leather cover.

Paper
The paper used in this book is much thicker than in regular Shutterfly albums. It's double-thick; the way the book is constructed is that each page is glued back-to-back with the next page. It looks great, feels great, and has gives the book a gravitas appropriate for a wedding album.

Picture Quality
Great! Very clear and bright. Good as or better than the pictures in a normal Shutterfly book. Like with my regular Shutterfly books, I didn't have to lighten my pictures more than normal before putting them into the book. (Other companies, like MyPublisher, I would have had to make the pictures extra-bright for them to print bright enough in the book.)

Binding
Here's where I ran into problems with this book. I ordered two copies of the book - one for us and one for my parents - and both copies' bindings broke after short-term, gentle use. How the binding is constructed is that the pages are glued back to back to back to back through the whole book, and then to the covers on either end. The pages are not attached to the spine, just to each other. This probably would not be a problem in a smaller book, such as if you stuck to the basic 20-page book. But Shutterfly allows you to go up to 111 pages, and I took advantage of that fact and used the entire 111 pages. And I think that this type of construction simply cannot support the weight of 111 double-thick pages glued back to back to back. In each of the books, the binding broke when pages pulled away from each other where they were glued together. In one book, this happened to pages in the middle of the book; in the other book, it happened where the pages were attached to the cover.

To Shutterfly's credit, customer service was awesome when I contacted them about this problem. They reprinted and shipped, without charge, a new copy of each book. However, I definitely think anyone planning on making a layflat book with Shutterfly should be aware of this potential problem. The more pages you add to the book, the heavier the pages will be all together, and the more likely they'll pull away from each other and you'll run into this sort of problem.

Here are a couple more pictures of the book!

You can see how flat the pages actually lie:

 
And with the layflat pages, you can do cool, uninterrupted two page spreads. I did two in my book, one of our dessert table and one of the big group shot:


Here's right where the middle crease is. No gutter, just straight across:


Here's a picture of the spine. You can see on the bottom right where two pages are peeling apart from each other; that's the weakness I talked about above.


Here's the thickness of the 111-page premium layflat book compared to a regular 111-page book:


And compared to a regular 20-page book:


And, in case you want to see what all the different pages in the book look like and what kind of layouts I used, here's the whole book:


Because of the binding issue, if I were to make another layflat book with Shutterfly, I wouldn't go much higher than the standard 20 pages. A hundred and eleven pages, while an available option, doesn't seem like it's really able to handle the layflat format. It's just too thick and heavy and the binding on the pages pull away from each other. If Shutterfly improves this in the future and somehow makes the binding more sturdy, I might consider making another large layflat book.

But, like I said, I'm very happy overall with the book. I'm just being very careful with the new, unbroken copy that Shutterfly sent me so that its binding remains intact.

And that's what I thought of Shutterfly's premium leather layflat photo book option!

To check out more of my photo book reviews, check out these posts:

Shutterfly Photo Book Review
Shutterfly Calendar Review
York Photo Photo Book Review
MyPublisher Photo Book Review
AdoramaPix Photo Book Review
Collage.com Photo Book Review 
Photo Book Comparisons

Thursday, December 5, 2013

Our Christmas Advent Calendar


For the last couple years I've really wanted to do a Christmas advent calendar every time December rolls around. I've seen lots of cute ideas on Pinterest (I especially like this book advent idea), but every year I forget to make one until it's too late. But not this year! This year I actually put one together! Last Sunday I realized it was the first day of December, and if I wanted to make an advent calendar I needed to make one that day. And I decided to go for it and just make a simple one so that we could do one this year.

I wanted our advent calendar focused on Christ, since he is the reason we celebrate Christmas and I really wanted him to be the focus of our home. And I found this awesome advent calendar that this woman put together, that's all about Christ! On the front of each day she has a picture of Christ, and on the back she has a scripture about him and an activity for the day. I used most of her scriptures (I switched a few out for some that I like even more) and a lot of her activities. Some of the activities seemed too old for Toddler, so I repeated a couple of the simple ones like "Read a Christmas Book" and "Sing Christmas Songs".


How I made our advent calendar was I made 25 squares out of scrapbook paper, wrote the scriptures and activities on the back and put a number on the front, and put those all on a corkboard that we have. On the top of the corkboard I put a picture of Mary, Joseph, and Jesus that I had from an old calendar that I kept the pictures from. And voila! Advent calendar. In the future I'll probably do a nicer, more permanent one like the woman in the link did, but this one's working just fine for this year. :)


Monday, October 28, 2013

What We Believe - a Short History of the Church

Sorry I missed last Sunday's "What We Believe"! I was powering through trying to finish the childhood photo album I had been working on. Today I'm back, and I think I'll try to write the next couple this week and schedule them to post beforehand, so that when the baby comes they'll still post on Sunday for the next couple weeks.

Last week (or two weeks ago, I guess), I talked about how we believe Jesus Christ's full and complete gospel has been restored on earth today, after many parts of it were lost and confused after his death and the death of his apostles. He called a prophet in our day, just as he has called prophets for thousands of years. That boy that he called as a prophet to restore his gospel was Joseph Smith. You can read all about how that happened in my last post

Today I want to share with you this video, which is the story of Joseph Smith and the restoration and establishment of The Church of Jesus Christ of Latter-day Saints (Mormons), told by members of the Church in Ghana, Singapore, Colombia and elsewhere.


I would like to add my testimony to theirs that I know The Church of Jesus Christ of Latter-day Saints is God's church. Its gospel is simple and beautiful. I will continue to do my best to share with you what it teaches, and why it brings such happiness and peace to our lives.